Reliable Quantitative Confocal Fluorescence Imaging using the Microscope Performance Monitor
Introduction
While fluorescence imaging using optical microscopy is primarily used for qualitative observation, it is increasingly used for quantitative analysis. In this case, regular maintenance is recommended since the light source’s power can fluctuate due to, for example, changes in the ambient temperature, resulting in poor image quality. In addition, the system’s laser power can also fluctuate due to a slight misalignment of the optics from the laser source to the microscope frame due to thermal expansion of the system.
Confocal microscopes are complicated pieces of equipment and maintaining or assessing the performance of them requires the skill of a trained technician. Regular microscope maintenance is important for experimental reproducibility and research quality, and this issue has been and is still being actively discussed.1,2,3,4 The International Organization for Standardization (ISO) has also weighed in on the issue, publishing ISO21073 2019, which specifies the image performance of confocal laser scanning microscopes.5
At Evident, we are aware of the importance of this issue and endeavour to address it. When we launched the FLUOVIEW™ FV4000 confocal laser scanning microscope in 2023, we decided to support it with a Microscope Performance Monitor that would help core lab managers and users track three key performance parameters that can influence quantitative confocal fluorescence imaging and have an impact on image quality.
In this white paper, we discuss these key performance parameters and how the Microscope Performance Monitor can help enable higher-quality quantitative imaging. We also discuss the principles and criteria for measuring each performance characteristic as well as the advantages the Performance Monitor offers to core labs and others who want to maximize their fluorescence quantitative imaging.
Quantitative Fluorescence Imaging Performance Factors to Monitor
In 2022, O. Faklaris et al. made recommendations regarding seven microscope performance metrics that should be checked regularly as well as guidelines for measuring each performance metric.6 The seven microscope performance metrics are: irradiance power stability, imaging performance, field illumination flatness, chromatic aberration, stage drift, stage position repeatability and detector background noise.
One challenge, though, is that it is difficult to measure these performance characteristics without a level of expertise in optical microscopy. Since this expertise can be hard to obtain, regular microscope maintenance to ensure that these seven factors remain in tolerance has been difficult, especially for core lab managers who are responsible for multiple microscope systems.
As a first step to help, Evident developed a solution that enables users to easily measure fluorescence signals quantitatively. Fluorescence signal fluctuations are difficult to determine based on the appearance of the image, so researchers are unlikely to notice these issues in contrast to something like chromatic aberration during co-localization observations or stage drift during time-lapse imaging, which are easier to notice. One of the aims of the Microscope Performance Monitor is to enable researchers to notice performance variations early in the process rather than after they’ve completed their imaging experiment, which can potentially lead to incorrect results and repeated work.
Out of the seven characteristics mentioned above, the brightness of a fluorescence microscope is highly dependent on three—irradiance power stability, imaging performance, and detection sensitivity.
This is because the fluorescence brightness depends on the intensity of the light irradiated on the sample and how well fluorescent signals can be detected.
In a fluorescence microscope, the intensity of the light irradiated on the sample depends on the laser power and the irradiated area. The irradiated area is determined by imaging performance, which is a measure of how accurately an optical instrument can focus light flux from a light source to a single point. In other words, both the laser beam focus and the intensity of the light irradiated on the sample, vary along with imaging performance.
Next, how well fluorescent signals can be detected depends on the detection sensitivity of the entire system. Therefore, monitoring how laser power, imaging performance, and detection sensitivity change is important for high-quality, consistent quantitative fluorescence imaging.
It is important to monitor laser power because the laser power irradiated through the objective lens can fluctuate due to changes in the ambient temperature or other various factors. The Microscope Performance Monitor measures the laser power just after it enters the FV4000 system from the fiber output, enabling the system to determine whether the power has changed relative to when the microscope was installed. By automatically adjusting the laser’s output power, the system can correct for fluctuations, enabling it to achieve a consistent value over time.
Detection sensitivity needs to be monitored to quantitatively understand any decline in detection efficiency due to deterioration of the optics or misalignment of the optical axis of the pinhole since the microscope was installed. The center position of the pinhole is particularly important for confocal laser scanning microscopes, and it can shift if the room temperature changes significantly due to, for example, seasonal changes. If the microscope is in a location where the temperature is carefully controlled and remains constant, the detection sensitivity may not need to be monitored, but not all confocal laser scanning microscopes are installed in this kind of highly stable environment. Also, although infrequent, dust and scratches on the lens surface can also reduce light transmission. However, since this change is gradual, the slow decline in performance can be difficult to notice.
Variations in imaging performance are mainly caused by scratches on the objective lens surface, dirt, using the wrong immersion oil, or incorrectly adjusting the correction collar. Without a strong knowledge of microscopy, it is difficult to notice most of these imaging performance issues. In a few cases, we have found performance issues caused by dropping an objective, but the core lab manager remained unaware of the problem as the drop was never reported.
While the above imaging performance problems are caused by issues relating to the objective lens, other factors, such as mirrors and lenses that have become misaligned with the optical axis due to temperature fluctuations, are common sources of performance issues.
How the Microscope Performance Monitor Works
The Microscope Performance Monitor independently measures laser power, detection sensitivity, and imaging performance. How the system measures each characteristic is explained below.
Laser power
An overview of the Microscope Performance Monitor’s laser power measurement system is shown in Figure 1. Once the measurement starts, the system automatically executes following flow.
1) 405 nm laser set to 100%, other lasers set to 0%.
2) The laser is emitted.
3) The laser is partially reflected by a beam splitter (BS) located immediately after the fiber introduction into the FV4000.
4) The laser input goes to a photo detector (the laser power monitor, or LPM) installed inside the FV4000.
5) The system calculates the laser power output at 100% from the actual LPM output value.
6) Set the laser to 0%, then change the short wavelength laser to 100%.
Repeat steps 2–6 for all installed lasers, in sequence.
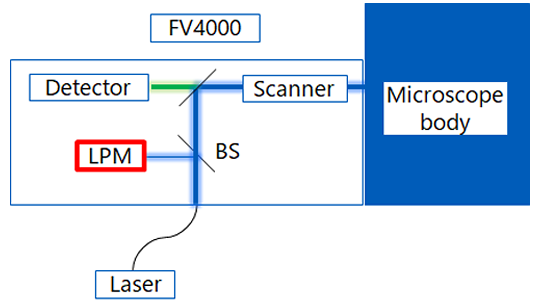
Figure 1: Schematic of the laser power measurement system.
The automatic correction of the laser power is performed using the value measured by the LPM. The measured current output is compared to the output at the time of the microscope’s installation, and the difference is calculated as a percentage. The laser control parameters are adjusted based on the calculated percentage to keep the laser output constant. We recommend users to enable this laser power monitor function before each image acquisition to ensure that the laser power remains constant for each imaging experiment.
To determine the extent to which the laser power measured by the Microscope Performance Monitor matched the actual light intensity emitted on the sample, we tracked the laser power measured by the Performance Monitor and the laser power emitted by the objective lens for six months. The results are shown in Figure 2. The laser power emitted from the objective lens was measured using a UPLSAPO10X objective lens.
As Figure 2 shows, there is a high correlation between the laser power measured by the Microscope Performance Monitor and the laser power emitted from the objective lens; the accuracy was confirmed to be within 5%. However, when the laser was set on low, the laser power emitted from the objective is not stable if the instrument is not sufficiently warmed up. Figure 3 shows results recorded while the system was warming up over a period of two hours. Changes in laser power emitted from the objective were recorded at six laser setpoints: 1%, 10%, 25%, 50%, 75%, and 100%. As can be seen in Figure 3, the lower the laser setting, the more pronounced the warm-up effect. Based on these data, we recommend that users warm up their system for a minimum of 60 minutes and then use the Microscope Performance Monitor to correct the excitation power before imaging.
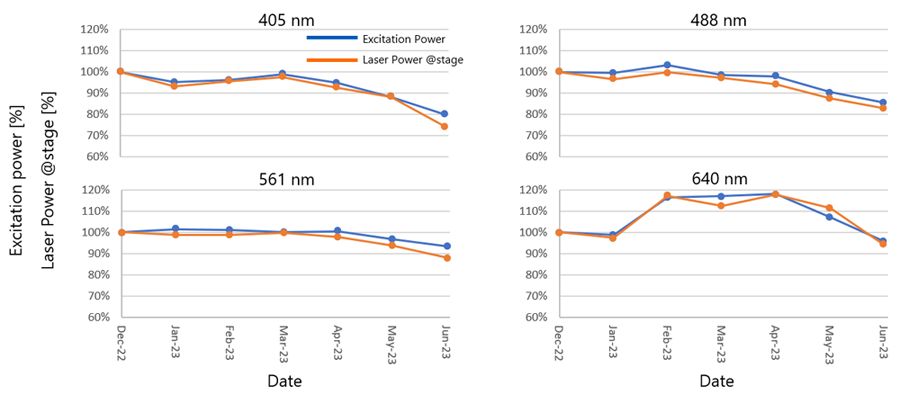
Figure 2: Comparison results between laser power emitted from the objective lens and laser power measured by the Performance Monitor.
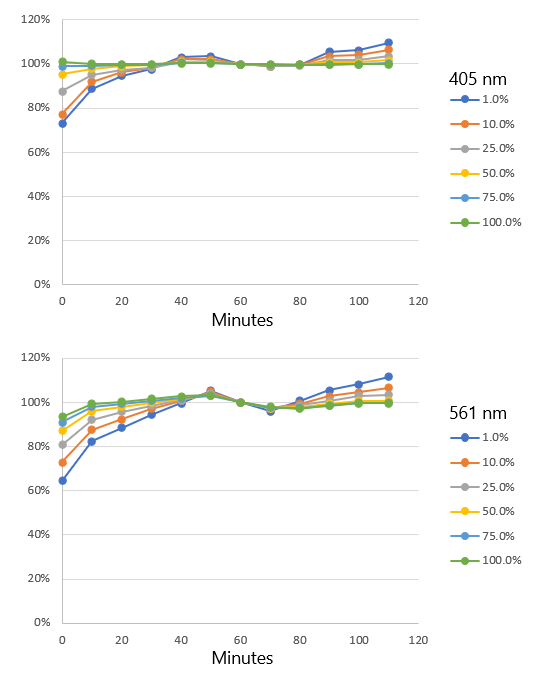
Figure 3. Variation of laser power output emitted from the objective during warm-up at different laser setting values (1%, 10%, 25%, 50%, 75%, and 100%).
Regular laser power monitoring can detect low power in the laser itself, as well as defects in the laser combiner and fiber. The trigger for maintenance is when the output power drops below 50% of the output power measured when the microscope system was first installed. When the laser power reaches this threshold, it may be insufficient for some applications such as deep observation even though the actual output power is always corrected to be consistent.
If the lasers are used continuously for several hours, the heat generation by the system may affect room temperature, causing the laser power to fluctuate. For this reason, we recommend that users keep track of how long the lasers are used and correct the laser power each time an image is acquired since it is sensitive to temperature changes.
Detection sensitivity
Two characteristics are measured for detection sensitivity: the sensitivity of each detector and the pinhole position. An overview of the measurement system for sensitivity of each detector is shown in Figure 4, and the Figure 5 shows a flowchart that illustrates the order in which images are acquired by detection sensitivity. Same as laser power measurement, once the measurement starts, the system automatically executes the following flow.
Detection sensitivity
1) Select beam splitter BS10/90 and turn the 405 nm laser and detector 1 to ON (the optical path is automatically adjusted so that the laser is reflected to the selected detector).
2) The corner cube mirror inserted in the microscope frame’s mirror turret reflects the laser light while reducing the laser power.
3) Laser light passes through the beam splitter and pinhole to the FV4000 detection system
4) Calculate the relative sensitivity of the detector (median value of the image) compared to the sensitivity of the same detector measured at the time of installation.
5) Turn detector 1 OFF, turn detector 2 ON, and repeat steps 2–4.
6) Repeat this process for all installed detectors.
Pinhole position
7) Select detector 1 again and repeat steps 2–4 10 times at each of the 10 pinhole optical axis positions (5 positions in each of the X and Y axes, where the pinhole surface is the XY axis).
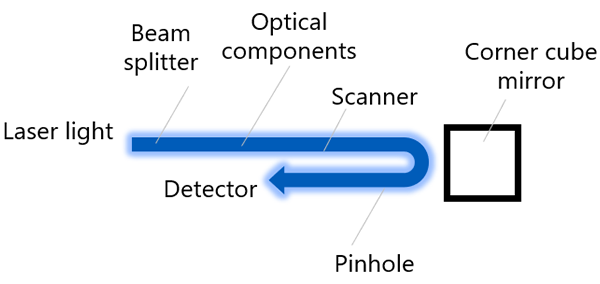
Figure 4: Schematic of the detection sensitivity measurement system.
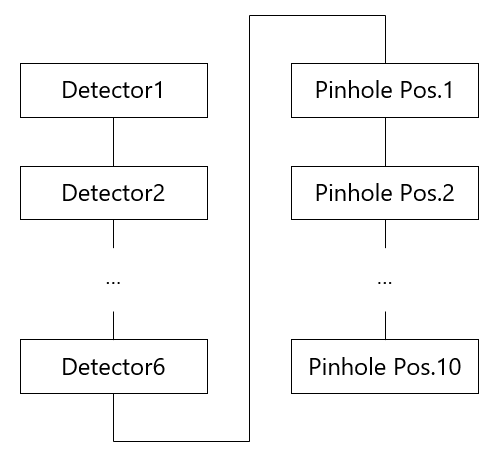
Figure 5: Flowchart of detection sensitivity measurement.
The measurement of detection sensitivity involves measuring the sensitivity variation of each detector and the proper shift position of the pinhole optical axis. A decrease in the overall detection sensitivity of the device can be attributed to misalignment of the pinhole optical axis positions.
Graphs of the relationship between the 11 pinhole optical axis positions and the corresponding output values of the detection system in both the X-axis and Y-axis directions are shown in the upper left and upper middle graphs in Figure 6. These graphs also show Gaussian approximation curves created using 5 of the 11 data points. By using the Gaussian approximation, the amount of displacement can be calculated with a high degree of accuracy, even when data on the center position of the pinhole optical axis could not be obtained.
The reduction in fluorescence intensity caused by pinhole optical axis misalignment depends on the magnification and numerical aperture (NA) of the objective lens. The pinhole is positioned conjugate to the objective’s focal plane, and the Airy size at the pinhole plane is determined by three factors: objective lens magnification, projection lens magnification, and Airy size at the focal plane.
The upper right graph in Figure 6 shows the relationship between the degree of misalignment of the pinhole optical axis and the fluorescence intensity in the cell specimen when two types of objective lenses are used. The lower part of Figure 6 shows three example fluorescence images, which are cell images taken with a UPLXAPO20X objective with the pinhole optical axes shifted by -0.5 AU, 0 AU (standard), and +0.5 AU, respectively. The upper right graph in Figure 6 is plotted based on the fluorescence intensities obtained from these images as well as from images acquired at each displacement amount using UPLXAPO20X (NA 0.8) and UPLSAPO100XS (NA 1.35) objectives.
The results are for a 1X magnification for the projection lens and show that when the pinhole optical axis is shifted by 0.32 AU (assuming an Airy size of 1 for the UPLXAPO20X objective), the fluorescence intensity decreases by 10% for UPLXAPO20X and by 1.1% for UPLSAPO100XS. This highlights that the effect of pinhole optical axis misalignment differs depending on the objective lens.
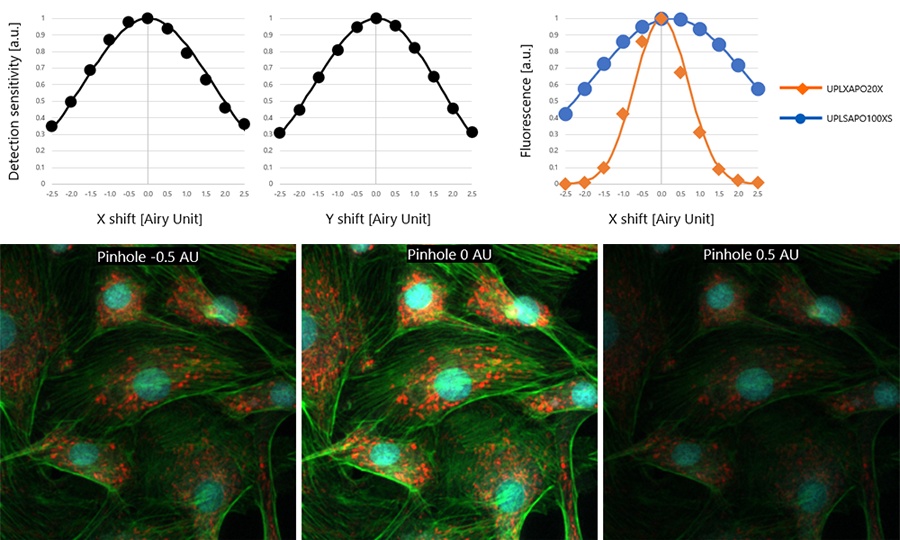
Figure 6: The measured values of pinhole optical axis misalignment vs. detection sensitivity (upper left, upper middle). The fluorescence intensity of UPLXAPO20X and UPSAPO100XS objectives vs. pinhole optical axis misalignment (upper right). Cell images acquired with a UPLXAPO20X objective with the pinhole optical axis shifted -0.5 AU, 0 AU, and +0.5 AU, respectively (bottom).
Maintenance is required when the sensitivity of each detector decreases to less than 80% compared to that measured when the system was first installed. The criteria for judging the pinhole position is based on the reduction rate of fluorescense intensity when using the UPLXAPO20X which is considered to have the gratest impact. Since it is difficult for researchers to adjust the detector sensitivity and pinhole position themselves, we recommend that users contact Evident if the results continue to show "Failed".
We recommend to measure the detection sensitivity frequently and each time, when critical quantitative imaging is required, since detection sensitivity can change slightly with ambient temperature changes and system warm up.
Imaging performance
Figure 7 shows how to calculate the three-dimensional line spread function (3D LSF) using three-dimensional reflection observations of an edge chart specimen. The process follows the steps below from the measurement of the reflected image to the quantitative evaluation of imaging performance.
1) Select an objective lens to be measured.
2) Set an edge chart specimen on the FV4000 stage.
3) Turn on the 561 nm laser, set the beam splitter BS10/90 and enable one detector.
4) Set the pinhole to 2 AU to acquire three-dimensional confocal reflection images of the edge chart specimen.
5) Extract the 3D edge responses from the 3D image, consisting of eight directions.
6) Calculate the LSF by differentiating the edge response.
7) Calculate the 3D LSF and 2D cross-correlation values of the LSF with ideal imaging performance; correlation values were obtained using zero-means normalized cross-correlation (ZNCC).7
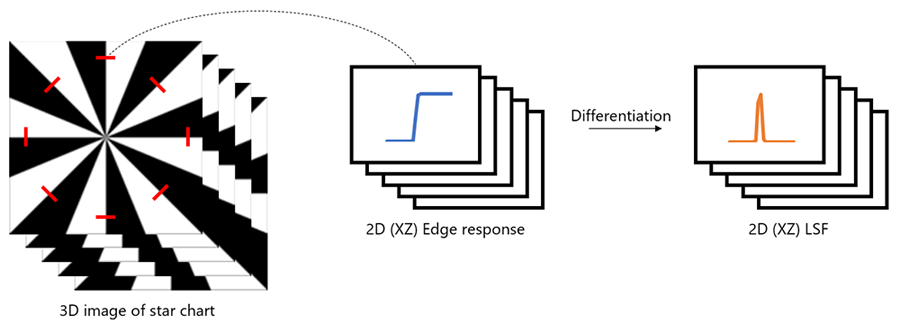
Figure 7: Schematic of the 3D LSF extraction method. 8 LSFs are extracted in the XZ direction.
The Microscope Performance Monitor automatically performs all other tasks except those that require manual intervention, such as setting the objective lens, focusing, and centering the edge pattern.
Three unique approaches are used to measure the 3D LSF with high accuracy. First, we intentionally set the pinhole at 2 AU so that more reflected light intensity can be detected, even during defocusing. Second, we used a specimen with as few as eight light/dark stripe pairs compared to a typical star chart, which prevents interference with reflected light from adjacent pairs during defocusing. Third, we made the edge pattern extremely thin, which enabled us to obtain edge responses close to theoretical values. These approaches result in more accurate and reliable 3D LSF measurements.
The point spread function (PSF), which is commonly used to evaluate imaging performance, shows how a single point appears on the image and can capture anisotropic degradation of imaging performance. However, LSF shows how lines are imaged and may miss degradation of imaging performance in certain directions.
In the method outlined above, the 3D LSF is acquired in eight directions, providing information that is almost equivalent to that of a three-dimensional PSF (3D PSF). Figure 8 shows the simulated results of a 3D PSF and a 2D LSF in eight directions when there is comatic aberration, which occurs when the objective is tilted and when the specimen cover glass or stage is tilted relative to the objective.
The 3D PSF has a banana shape, and the 2D LSF has a similar banana shape. However, in certain directions, anisotropic aberrations—such as coma aberration are not captured by the 2D LSF and may appear to be aberration-free. By acquiring a 2D LSF in 8 directions, it is possible to capture anisotropic information as well as a 3D PSF.
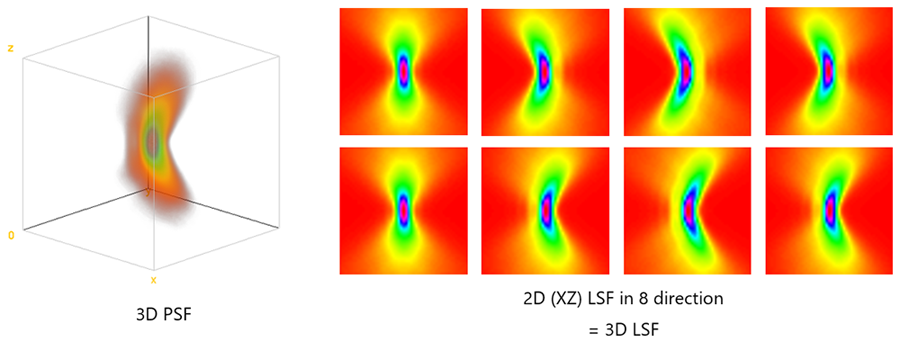
Figure 8. Comparison of the 3D PSF and 3D LSF obtained from a simulation.
To quantitatively verify that the LSF in 8 directions is at the same level as the PSF, we calculated the Strehl ratio of the PSF and the ZNCC of the LSF while varying the amount of comatic and spherical aberrations. The Strehl ratio is a value that quantitatively indicates the light gathering intensity and is expressed as the ratio of the center intensity at the PSF of the actual optical system when the center intensity at the ideal PSF obtained with an aberration-free optical system is 100%. The Strehl ratio is also known to be highly correlated with wavefront aberration, which is an indicator of objective lens quality control.
Coma aberration is one of the aberrations that occur when using a microscope, as described earlier, and spherical aberration is another aberration that can be caused by inadequate adjustment of the objective lens' correction collar, using the wrong immersion medium, or liquid accidentally adhering to the objective or sample surface. The graph shows the effects of these aberrations; the ZNCC values are averages of the calculation results in 8 directions. Also shown for reference is a graph comparing the full width at half maximum (FWHM) of the PSF with the Strehl ratio. The Strehl ratio and FWHM are two quantitative indicators of PSF.
The graph in Figure 9 shows that there is a high correlation between the PSF's Strehl ratio and the LSF’s ZNCC, with a high coefficient of determination R2 of 0.959 in the linear regression. This suggests that the ZNCC of the 3D LSF can be substituted for the 3D PSF's Strehl ratio. On the other hand, while there is a correlation between FWHM and Strehl ratio, it suggests that care should be taken in setting a uniform threshold value. For example, if the measured FWHM is 340 nm, it may be assumed that there is no problem with the imaging performance because it is close to the theoretical value of 320 nm, but there could be a case where the Strehl ratio is reduced to 65% due to spherical aberration. However, the ZNCC calculated from the 3D LSF can be used to determine the image formation performance with a higher accuracy than the FWHM of the PSF.
Direct measurement of the Strehl ratio, another index, requires a separate device for measuring wavefront aberration from the microscope, making it difficult for the user to directly measure it. Instead, users can use the ZNCC to determine imaging performance.
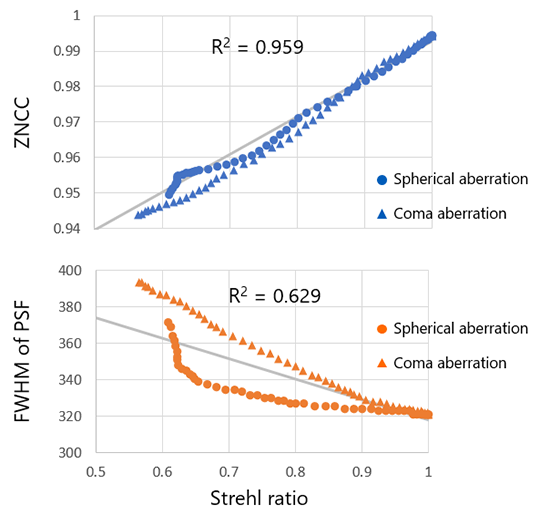
Figure 9. The relationship between the Strehl ratio calculated from the 3D PSF and the ZNCC calculated from the 3D LSF (upper) and FVHM calculated from the 3D PSF (below).
The imaging-performance-related trigger that requires maintenance is when the Strehl ratio drops to less than 80%. Generally, 80% of the Strehl ratio is called as the diffraction limit, and an objective lens with a Strehl ratio below 80% has unsatisfactory performance. We recommend that users run an imaging performance check every time they start their FV4000 system. We recommend rerunning this check if the user changes and after 24 hours of use.
Microscope Performance Monitor Applications
Figure 10 shows the results of a quantitative evaluation of a control sample in a fluorescence quantification experiment. The control sample differs by experiment, but in this example, it is defined as the sample used to align the standard of the fluorescence intensity. Here, the second experiment was performed one month after the first. The first experiment was performed after the conditions for fluorescence observation had been established, and the second experiment was performed immediately after the instrument was turned on.
Although confocal microscopes containing lasers need to warm up according to the manufacturer's specifications, the experiments were performed immediately after startup to clearly show the effect. The graph in Figure 10 compares the fluorescence intensity of the first and second control samples with and without the Microscope Performance Monitor.
The results show that when correction is not performed using the Microscope Performance Monitor, the performance is unstable immediately after instrument startup and the data fluctuates widely. On the other hand, when performance correction was performed, fluorescence quantification was possible with high accuracy, even in experiments conducted across days.
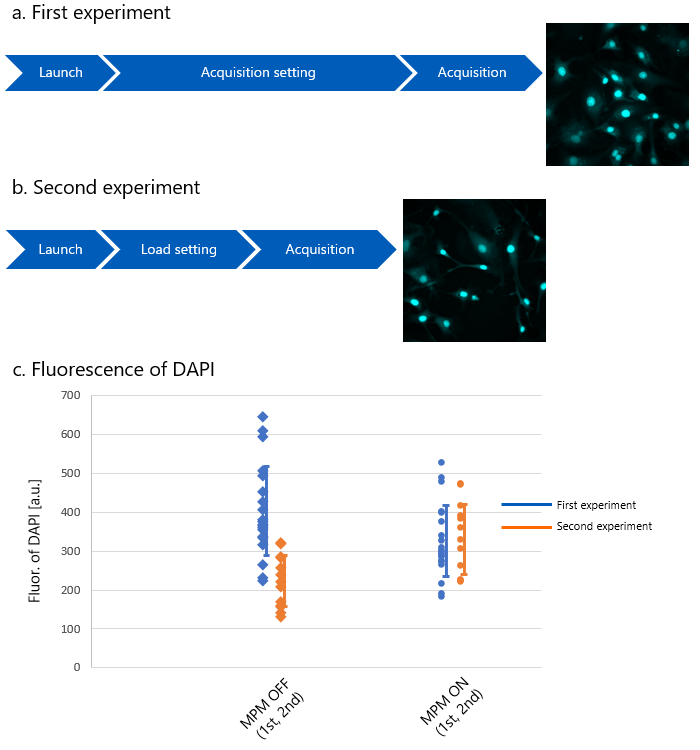
Figure 10. The variation in fluorescence intensity of control samples during the two-day experiment.
Summary
The Microscope Performance Monitor provides semi-automatic maintenance capabilities for the FV4000 laser scanning confocal microscope. This improves the efficiency of maintenance work and eliminates the need for maintenance training for other users. In addition, the system frees managers from spending time troubleshooting and provides clear data, which makes it easier to communicate exactly what is wrong with the microscope system when talking with the manufacturer, helping minimize downtime. As an added benefit, the data provided by the Microscope Performance Monitor can help educate users about the importance of equipment warm-up, objective lens correction collar adjustment, and fluctuations in laser power emitted from the objective.
For researchers who use confocal laser scanning microscope system in their experiments, monitoring microscope performance relating to fluorescence intensity fluctuations beforehand can significantly reduce variability in fluorescence quantification, leading to more consistent images and quantitative data. The Microscope Performance Monitor's semi-automatic measurement capability ensures that even novice microscope users can easily perform these measurements. Moreover, if the experiment results are unexpected, it helps identify whether the issue lies with the microscope or the sample.
We believe that improving not only the reproducibility of individual user experiments but also the reproducibility of research paper is crucial for researchers. To this end, we EVIDENT will continue our efforts to improve the traceability of microscope performance measurement data.
*This content was based on technical development at RIKEN CBS-EVIDENT Open Collaboration Center (BOCC) and is patent pending.
Author
Yasuo Yonemaru
Advanced Technology, R&D, Evident Corporation
1. G. Nelson, et al. “QUAREP-LiMi: A community-driven initiative to establish guidelines for quality assessment and reproducibility for instruments and images in light microscopy”, Journal of Microscopy, vol. 284 (1), 56–73, (2021).
2. U. Boehm, et al. “QUAREP-LiMi: A Community Endeavor to Advance Quality Assessment and Reproducibility in Light Microscopy.” Nature Methods, vol. 18, 1423–1426. (2021).
3. H. K. Jambor. “A Community-Driven Approach to Enhancing the Quality and Interpretability of Microscopy Images.” Journal of Cell Science vol. 136 (24), jcs261837, (2023).
5. ISO 21073-2019 “Optical data of fluorescence confocal microscopes for biological imaging”
6. O. Faklaris, et al. “Quality Assessment in Light Microscopy for Routine Use through Simple Tools and Robust Metrics.” Journal of Cell Biology, vol 221 (11), e202107093, (2022).
7. Lewis, J. P. "Fast Normalized Cross-Correlation." Industrial Light & Magic, 1995.
Products Related to This Application
was successfully added to your bookmarks
Maximum Compare Limit of 5 Items
Please adjust your selection to be no more than 5 items to compare at once
Not Available in Your Country
Sorry, this page is not
available in your country.