Fluorescence imaging requires a delicate balancing act. On one hand, you need to acquire a high enough signal, which you can achieve by using a longer exposure time or stronger excitation light. On the other hand, you need to minimize phototoxicity for the sample condition by reducing the excitation time and intensity.
Discover how to strike that balance with these microscope camera best practices.
1. Use a histogram.
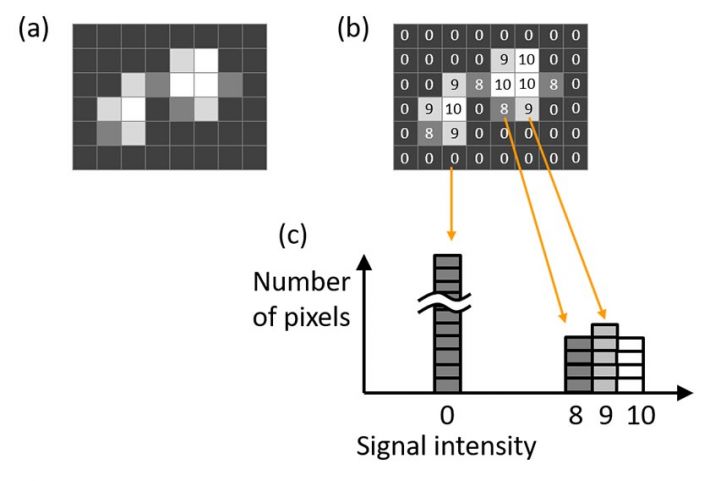
A histogram can help you determine the ideal exposure time. Simply put, the histogram is a plot that indicates the distribution of signal level. The X axis of the histogram is signal intensity. The data distributes from zero to the maximum signal level of the camera. The height of the histogram at each X value shows the number of pixels for the signal intensity, as shown in Figure 1 below.

Figure 1: A histogram of an image. (a) Original image, (b) signal intensity of each pixel shown in the original image, (c) a histogram created based on the original image.
The shape and distribution of the histogram tell us if the current exposure time is appropriate. In the majority of fluorescence imaging cases, most pixels are dark background without signals, which leads to a peak around the background level.
If the histogram is too crowded in a low signal range, then the exposure time is too short (Figure 2, middle). If there is a sharp cliff at the maximum signal level, then the signal value is saturated (Figure 2, right). In this case, you can reduce the excitation intensity or shorten the exposure time.

Figure 2: A histogram at normal exposure (left), under exposure (middle), and over exposure with saturation at the yellow marker (right).
2. Match the display dynamic range to the data dynamic range.
Some image acquisition software have an automated display adjustment feature that provides better visibility and maintains the original image data, all while defining the link between signal intensity and the display brightness.
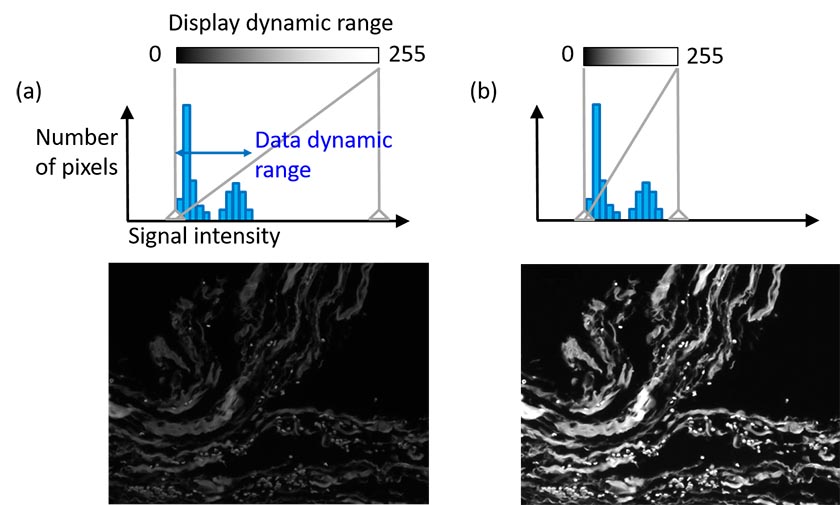
Matching the display dynamic range to the data dynamic range (the range from background level to the brightest signal) enables you to get better visibility while maintaining the original image data (Figure 3, right). A histogram helps to illustrate this adjustment.

Figure 3: Display adjustment. (a) Original setting. The displayed signal brightness is much dimmer than the display dynamic range (255). (b) Display condition adjusted.
Now that we’ve covered some helpful microscope camera tips and tools, let’s put them into practice. Our next section outlines a simple step-by-step workflow that can help you set the most appropriate image acquisition settings for fluorescence imaging.
6 Steps to Set Up a Microscope Camera’s Acquisition Parameters
Here are six general steps to properly set up a microscope camera for a fluorescence imaging experiment. Please note that the best procedure depends on your specific application and samples.
- Determine the observation magnification.
- Adjust the focus on your sample and find the observation target. Auto display adjustment is recommended. Always close the fluorescence shutter whenever you’re not observing a live image or taking a picture.
- Set the camera setting for image acquisition (e.g., resolution, exposure time).
- Try the gentlest excitation light intensity and lengthen the exposure time until you get the signal higher than the background noise.
- If the exposure time is unpractically long, try a slightly stronger excitation step by step.
- Check the histogram to confirm there is no saturation.
Keep in mind that this is a brief list of best practices. For more detailed instructions on digital imaging, be sure to check out our white paper, Understanding the Link Between Digital Image Data and Biological Samples.
Always Consider Your Sample and Application for Fluorescence Imaging
The best image acquisition setting ultimately depends on your sample and application. If your sample is delicate, you might need to use gentle excitation. On the other hand, applying shorter exposure with relatively strong excitation might work best when you need to capture fast phenomena. Either way, the histogram and display adjustment can help you determine the ideal acquisition condition.
Related Content
6 Tips for Fluorescence Live Cell Imaging
Understanding the Link Between Digital Image Data and Biological Samples
Digital Imaging in Microscopy: Frequently Asked Questions (FAQs)
.jpg?rev=2F8D)
