When returning to the lab, one common concern is how to catch up on a delayed experiment. While you may have lost valuable time social distancing, there are a few smart tricks that can help you accelerate experiments and stay on schedule.
A basic strategy is to perform work faster, simultaneously, or both. But, how? The answer is to learn from concepts used in the unique approaches of high-content or high-throughput experiments and apply them to your own project.
Here are five practical ways to accelerate your microscopy experiments:
1. Observe more samples.
If you have more than two slides or two dishes to observe, why not observe them all at once?
After all, the setup is simple. Inverted microscopes stages have universal mounting standards like a K-mount with a 160 × 110 mm dimension. Plus, many vendors provide stage inserts to handle a variety of samples.
It’s a quick, easy fix to observe multiple dishes or multiple slides so that you can perform your experiment at the same time—and it has substantial time-saving benefits. This approach reduces time for sample exchange and the general experimental setup because most time-consuming setting processes, such as focusing or image acquisition optimization, are the almost the same for multiple samples.
Today, less time in your lab also provides a clear advantage as institutions continue to practice social distancing and limit lab access.

Figure 1. By putting three dishes on the microscope stage instead of just one, you can reduce the time spent on experiment prep and setting optimization, shortening your time in the lab
2. Speed things up.
Next, optimize the speed of your image acquisition. Because the usual bottleneck that slows down image acquisition is the mechanical switching process of filters or fluorescence cubes, it’s worth considering the following ideas:
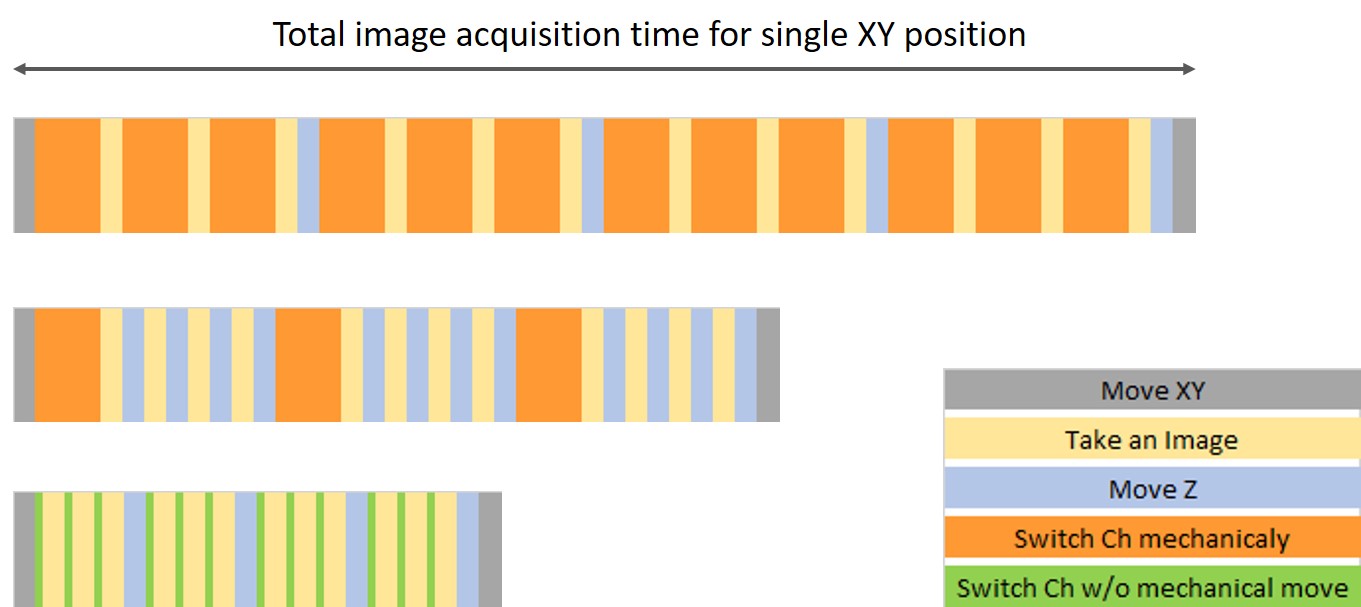
- Optimize the image acquisition sequence: If shifting Z for the Z-stack is faster than the fluorescence filter change, you should acquire images for multiple Z-stacks by not changing the fluorescence channel and then going to the next channel (Figure 2, middle).
- Combine a multiband cube and LED light source: The latest microscopy technologies have provided some improvements without tradeoffs. The combination of an LED light source and multiband filter is one of them. Even though single-band dedicated filters for each channel are the ideal solution to prevent fluorescence light bleeding in general, the latest LED light sources have a sharp enough spectrum that avoids the bleeding and a fast wavelength switching feature. This enables
you to leverage the advantage of multiband filters to shorten the image acquisition time. One tip to use a multiband filter is to use brighter dye at a longer wavelength, if possible. The reason is that bleeding occurs from the shorter wavelength (higher energy) to the longer wavelength (lower energy).

Figure 2. Image acquisition sequence variation showing how long each sequence takes. (Top) Ch > Z sequence, (middle) Z > Ch sequence, which can save time by reducing the mechanical movement for switching channels, (bottom) Ch > Z sequence with no mechanical movement for the Ch switch.
- Reduce the number of Z-stacks: Another consideration is to reduce the time for Z-acquisition. If you have a reliable enough autofocus mechanism, you don’t need to acquire too many Z-positions and can reduce the image acquisition time, eventually minimizing the phototoxicity from the excitation light.
3. Balance throughput with image quality.
In general, you should try to acquire the best quality images. After all, an image is the main source of data, so image quality determines the quality for downstream analysis. But it’s worth considering the level of image quality needed for the purpose of your experiment to accelerate your project. Here are two things to consider:
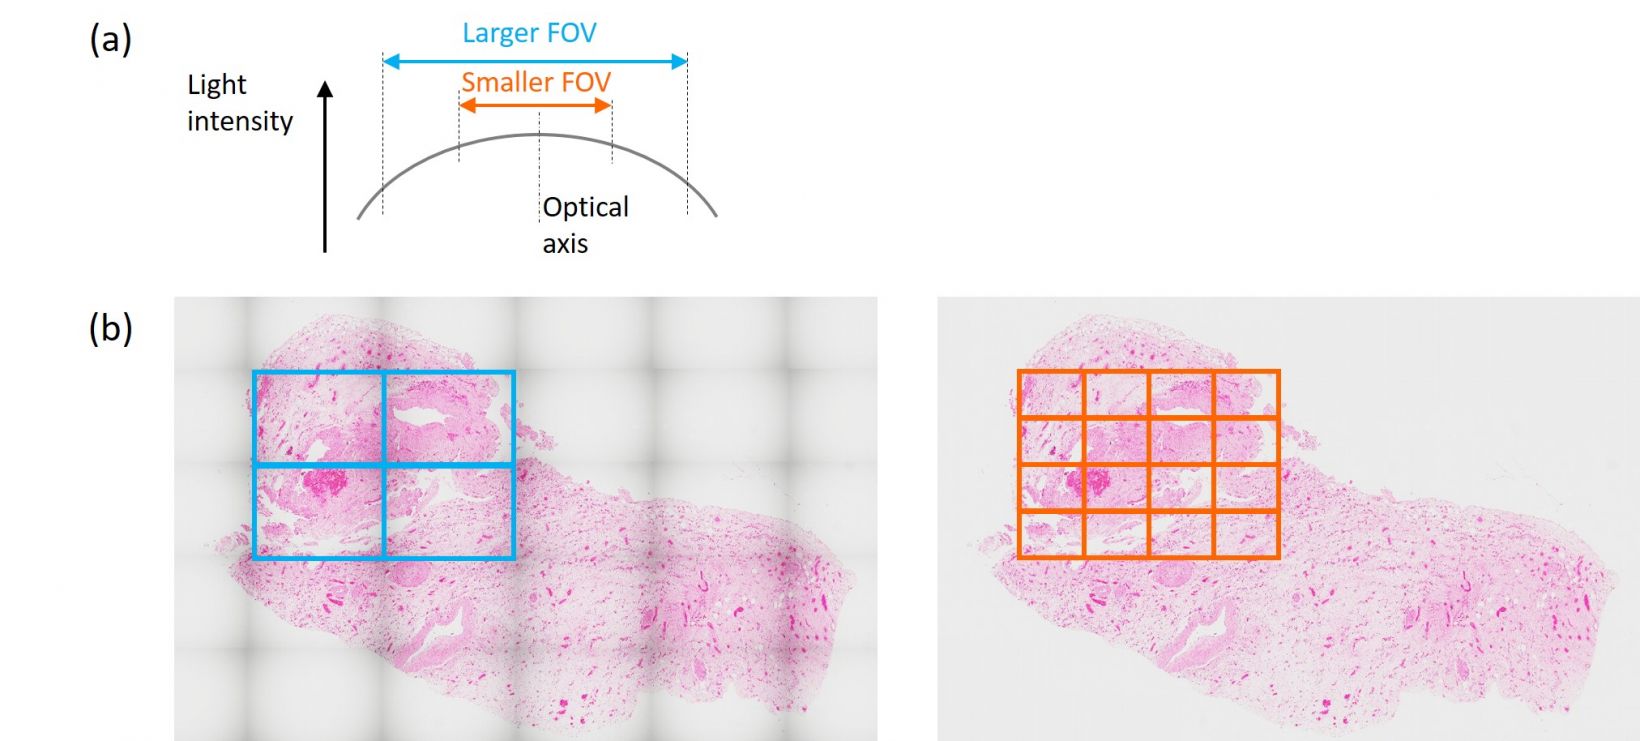
- Speed vs. quality: One major tradeoff with image quality is field of view (FOV) and image acquisition time. When we don’t use the peripheral area of the FOV, we can get flatter and more uniform images. Yet, this causes a higher number of image acquisitions to cover an equal area, which takes longer. This strategy creates seamless stitching or precise quantitative analysis with minimum effect on image nonuniformity at the peripheral area. But if you don’t need a
perfectly seamless stitched image, consider using a wider FOV or much lower magnification if it can provide sufficient resolution for your research. Can’t compromise both speed and quality? Then use the latest high-performance objectives that can produce super flat, uniform images across the entire FOV.

Figure 3. (Top) Light intensity at the optical axis and at the peripheral area of the field of view is one element that can impact image quality. When we observe a larger FOV, shading gets worse. (Bottom left) Stitching with a larger FOV means less time for image acquisition but the image seam might stand out. This strategy can speed up your experiment when a lower image quality is acceptable. (Bottom right) If a seamlessly stitched image is needed, then use a smaller FOV.
- Vessel type: Although glass-bottom dishes or plates are the best for image quality, polystyrene plates offer cost savings and better cell adhesion. Here are tips when you choose a non-glass vessel:
- Note that vessel type affects both the image quality and the working distance (WD). When imaging with a thicker vessel, such as a plastic plate, a longer WD is usually needed. Most plastic vessels have a 0.5–1 mm thickness, which is thicker than the 0.17 mm of a glass bottom vessel. Make sure to use an objective with a long enough WD for a thicker vessel.
- Confirm your system’s compatibility with the plastic vessel. For instance, differential interference contrast (DIC) can’t be used for plastic vessels due to the polarization of plastic.
- Plastic vessels have some degree of autofluorescence. While a lower autofluorescence level won’t cause much background light, a higher autofluorescence level can bury the fluorescent light from the sample. Always confirm the autofluorescence, particularly with UV or blue excitation, before choosing the vessel for your experiment.
4. Check for data consistency and a reference point.
When doing an experiment with many samples, data consistency and a reference point are the keys to data reliability and reproducibility. To achieve this:
- Use a stable cell line
- Avoid the periphery of plates where the environmental uniformity (particularly temperature) is different from the central area
- Always have positive and negative reference samples
- Check for environmental stability, particularly with the room temperature
5. Leverage overnight opportunities.
Some motorized and automated systems like high-content screening systems or whole slide imaging scanners have a batch function for image acquisitions. Batch processing is available with analysis software as well. If you have enough samples or data to process overnight, you should try. Your tools can continue your experiment while you’re sleeping.
As labs adapt their policies daily to ensure the safety and health of employees, please note that an overnight experiment might have a risk of unexpected lockdown or sudden change in institute policy. Remember to check with your manager if it’s okay to conduct an overnight experiment before moving forward.
Related Content
6 Tips for Fluorescence Live Cell Imaging
The Importance of Quantitative Cell Culture for Successful Experiments

